Showing posts with label Grilling. Show all posts

Wednesday, August 10, 2011

Grilled Pizza


Hey guys, long time no see!!!   I'm so sorry for the lack of posting recently.  It's not that I haven't been cooking, I definitely have, but I guess I've been lacking the drive to sit at the computer.  I'm going to blame the heat the last few weeks... easy excuse, right?  Anyway, I thought that tonight I'd post one of the delicious recipes I've made lately from my new favorite cookbook- Gourmet Today.  I've found so many great recipes so far, and I'm dying to make many many more.  There are seriously hundreds of recipes that jumped out at me when I read through the cookbook.  I am going on vacation tomorrow, down to Virginia, but when I get back I am hoping that my relaxing vacation reinspires me to jump back into blogging.

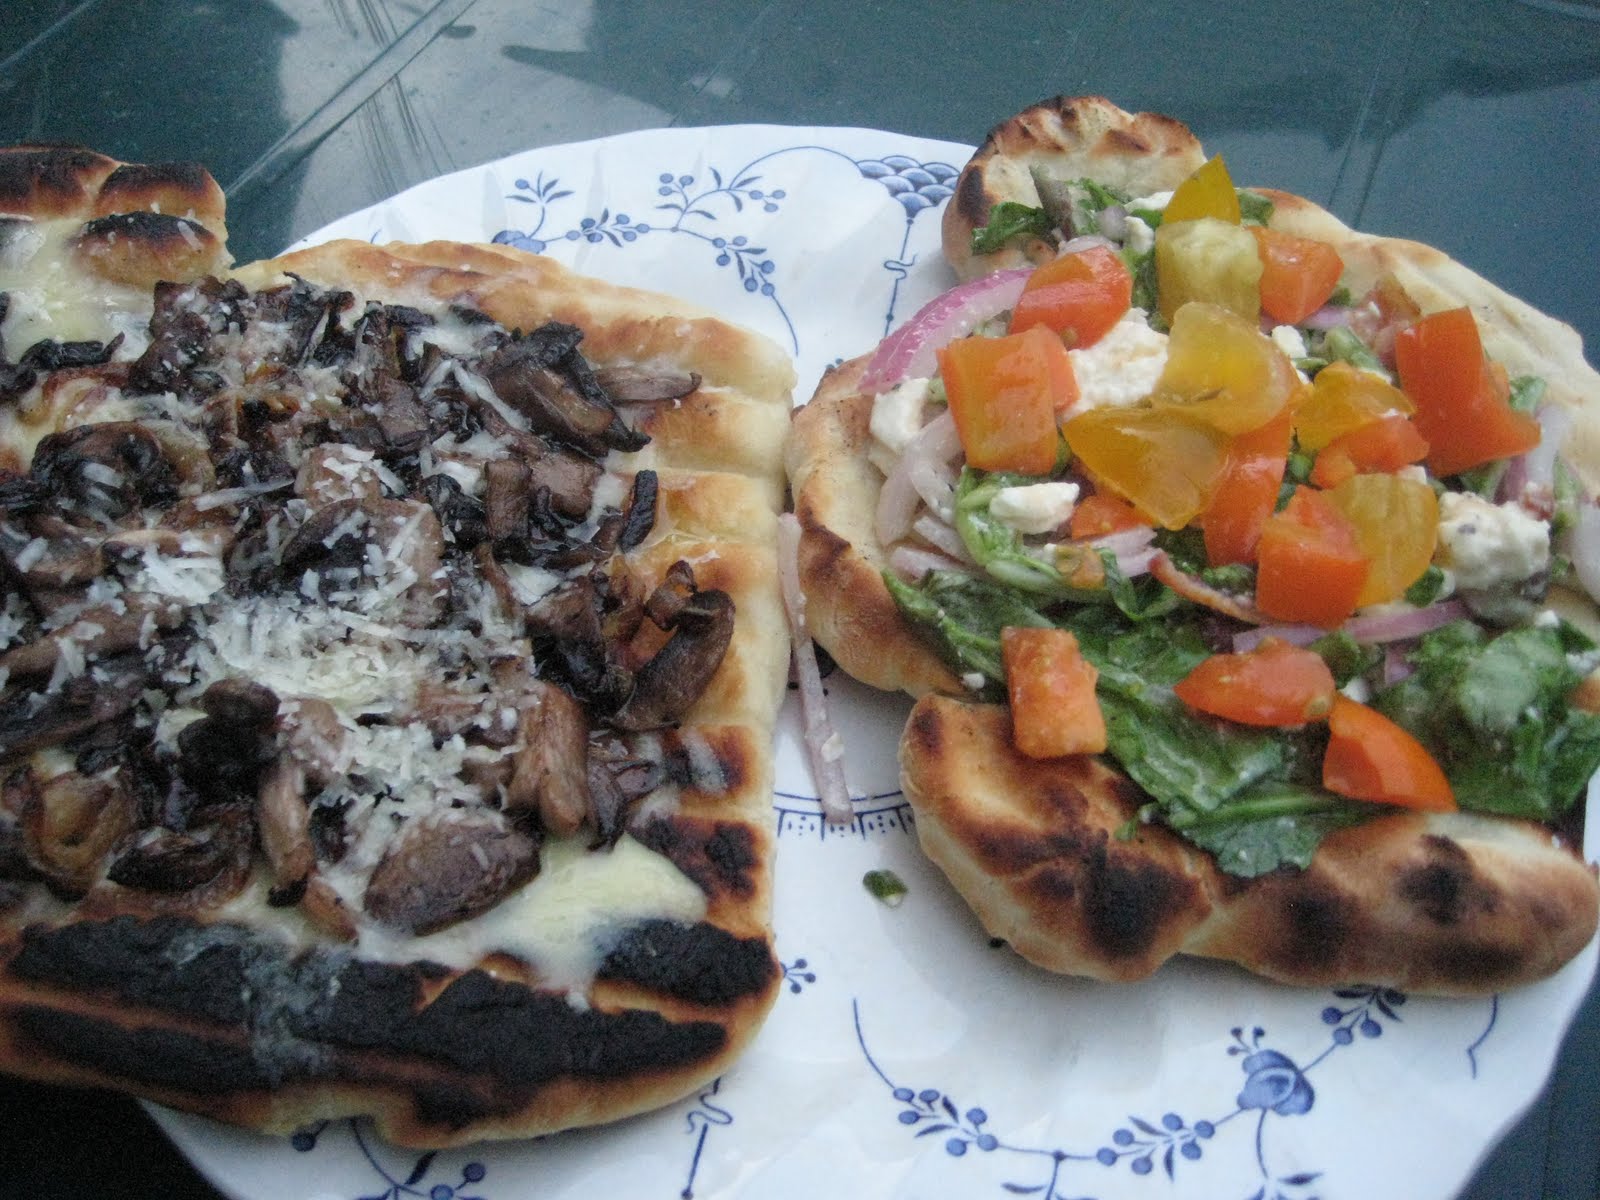
As you know from the title, this is a recipe for grilled pizza.  Before I made these, I'd never made any kind of pizza, but after seeing how awesome these came out I've been dreaming up many more pizza combos I'd love to try out.  I used the basic dough recipe from Gourmet Today, but obviously cooked it on the grill instead of the oven, and while I'd describe it more as "flatbready" I suppose, it was super-awesome.  I made 4 mini-pizza with 2 types of toppings- the first, a caramelized onion and mushroom pizza was amazing, and the second, a BLT pizza was just as good, but more of a summery pizza.  The caramelized onion and mushroom I'd consider a year-round pizza.  Both were incredible.

Basic Pizza Dough

Ingredients:
1 (1/4-ounce) package (2 1/4 tsp) active dry yeast
About 1 3/4 cups unbleached all-purpose flour, plus more for kneading and dredging
3/4 cup warm water (105-115 degrees)
1 1/2 tsp salt
1 1/2 tsp olive oil

Directions:
1. In a measuring cup, stir together the yeast, 1 tbsp flour, and 1/4 cup warm water.  Let sit about 5 minutes, until the surface appears creamy- if this doesn't happen, discard and try again with new yeast.)
2. In a large bowl, mix together 1 1/4 cup flour and salt.  Add the yeast mixture, olive oil, and remaining 1/2 cup warm water.  Stir until smooth.  Stir in enough of the remaining 1/2 cup flour so that the dough comes away from the side of the bowl.  
3. Knead the dough on a lightly floured surface, with lightly floured hands, for about 8 minutes, until the dough is smooth, soft and elastic.  If the surface, or your hands become sticky, add more flour.  Form the kneaded dough into a ball, place in a lightly floured large bowl, dust the dough with flour, and cover loosely with plastic wrap.  Leave to rise in a warm, draft free place for 1 1/4 hours, until the dough doubles its size.
4. Once the dough is risen, carefully dredge in flour to coat, and transfer to a lightly floured work surface.  **Do not punch the dough down**  
5. At this point, you can either make one large 14-inch pizza, or smaller individual ones- I made 4 mini-pizzas.  Either way, carefully hold the dough with the bottom surface touching your work surface, and move the dough around with both hands as if holding a steering wheel, letting the weight of the dough stretch into a round.  Once to your desired size, place the round on a lightly floured surface, and work the edges with your fingers to get it to the desired size.
6.  Once formed, your dough is ready to top, bake or grill, depending on which recipe you are using for toppings.
** To grill, heat grill to medium-high heat.  Oil the grates well!  Brush the pizzas with olive oil on each side.  Place on grill over indirect heat (not over the coals- they'll burn fast!).   Cook about 3 minutes, covered, until the dough begins to have large bubbles on the surface, and the underside is cooked.  If you are going to be putting on a topping that will warm up/melt cheese, remove the dough round to a clean surface with the cooked side facing up, and place your cheese/toppings on.  Return to grill and cook, covered for 4-6 minutes, until the dough is cooked, and the toppings/cheese are ready.  If you are putting a topping on that does not need to be cooked (like the BLT pizza), just flip the dough round over, and cook, covered for about 4 minutes.**  (Grilled pizza instructions adapted from Annie's Eats)

Notes:
  • You can leave the dough to rise up to a day, covered and refridgerated.  Bring it to room temperature before you shape it.
  • After rising, the dough can be frozen up to 1 month.  Thaw and bring to room temperature before shaping.
  • My pizzas were definitely not round, but they were still tasty- this is a recipe where only practice will make perfect!
  • Watch your dough closely, as it can burn quickly.  My pizzas had a little char to them, but the smokiness just added some more delicious flavor.  Too much though, and it would probably overwhelm.


Mushroom and Caramelized Onion Pizza

Makes one 14-inch pizza, or 4 individual pizzas

Ingredients:
5 Tbsp extra-virgin olive oil
1 pound yellow onions, halved lengthwise and thinly sliced lengthwise
Salt and freshly ground black pepper
1 pound white mushrooms, or mixed wild mushrooms (such as shitake, cremini and oyster), trimmed if   necessary and sliced
1 tsp red wine vinegar
2 3/4 cups coarsely grated Swiss Emmental cheese, or Gruyere (about 8 ounces)
1/2 cup finely grated Parmigiano-Reggiano
1 tbsp fresh thyme leaves
Basic Pizza Dough (recipe above)

Directions:
1. In a 12-inch heavy skillet heat 3 tbsp olive oil over medium heat until hot but not smoking.  Add the onions, 1/4 tsp salt, and 1/8 tsp pepper.  Cover directly with a round of parchment paper.  Cook until the onions are softened and golden brown, stirring occasionally, about 18-20 minutes.  Transfer the onions to a bowl.
2. To the same skillet, add the remaining 2 tbsp olive oil, and heat until hot but not smoking.  Add the mushrooms, 1/2 tsp salt, 1/4 tsp pepper, and red wine vinegar, and cook about 8-10 minutes, stirring occasionally, until the mushrooms are browned and any liquid is evaporated.  Remove the mushrooms from the heat. 
3. Cook one side of your pizza dough on a grill preheated over medium high heat (as detailed above).  When done, remove to a clean surface.  Top the cooked side of the dough with the Emmental or gruyere cheese.  Scatter onions and mushrooms on top, and sprinkle with Parmesan.  
4. Place back on the grill over indirect heat, and cook, covered, 4-6 minutes, until the dough is cooked, and the cheese is melted.  Sprinkle with fresh thyme.

Notes:
  • The original recipe calls for Swiss Emmental cheese, but I had some gruyere left over so I used that instead, and it turned out wonderful.  Any type of Swiss cheese would probably do just fine, depending on how strong or mild you like it. 
  • I omitted the thyme because I thought I had some, but when I went to make the pizzas realized I didn't, but I didn't miss it at all.  I'm sure it would've been good, but I don't think it's necessary.
  • I halved this recipe to make 2 individual pizzas.


BLT Pizza
from Annie's Eats, dressing from Annie's Eats and Alton Brown via foodnetwork.com

Makes 4 individual pizzas

Ingredients:
Basic pizza dough (recipe above)

For salad topping:
4 cups green leaf lettuce, or mixed greens
1 tomato, seeded and diced
1/2 small red onion, thinly sliced
4 slices bacon, cooked and crumbled (drippings from cooking reserved for dressing)
1/2 cup crumbled feta cheese

For bacon vinaigrette:
1 1/2 tbsp extra virgin olive oil
2 tbsp cider vinegar
1 tbsp bacon drippings
1 1/2 tsp brown sugar (preferably dark)
1 1/2 tsp dijon mustard
1/4 tsp salt
1/2 tsp freshly ground pepper

Directions:
1. Combine the ingredients for the bacon vinaigrette in a small bowl, or salad dressing bottle, and whisk (or use handy emulsification device) to combine.
2. Combine the lettuce, tomato and onion in a large bowl, and toss to combine.  Add 1/4 cup of dressing to the salad, and toss gently to coat.  Add the bacon and feta to the salad, and toss gently to combine.
3. Make your grilled pizzas (recipe above), cooking both sides.  Top your cooked pizza dough with some of the salad mixture, and serve!

Notes:
  • This salad is great on it's own, so if you don't want to make pizza, or if there is leftover, eat it plain!
  • You can also use the vinaigrette to dress any salad.... In Alton Brown's original recipe he uses basically double the amount, and tops 2 quartered heads of radicchio.  For quantities for his recipe go here!
  • This is one of the most refreshing summery pizzas I've ever had, and although topping a pizza with salad may seem a bit unusual, I can't wait to make some other summery salad pizzas.

    Monday, July 4, 2011

    Chipotle Turkey Burgers

    I know, I know, another burger recipe... but hey, it's summer!  ... and today's the 4th of July, and burgers are one of those quintessentially American things, along with hot dogs, and apple pie, and fried chicken.... I actually did not make these to celebrate the holiday, but I think they'd be a great thing to make today.  So they are not traditional burgers, but a really delicious riff ... chipotle peppers and abobo sauce mixed into the meat, topped with avocado, tomatillo, and cilantro.  Awesome!

    Happy Independence Day!!


    Chipotle Turkey Burgers

    Serves 4

    Ingredients:
    1 lb ground turkey, preferably dark meat
    2 tsp minced chipotle in adobo plus 1 tsp adobo sauce
    2 garlic cloves, pressed
    4 slices Muenster cheese
    4 hamburger buns, toasted
    1/4 cup mayonnaise
    1 large tomatillo, husked and rinsed, then sliced
    1/2 small avocado, sliced
    1/2 cup cilantro sprigs

    Directions:
    1. Preheat your grill to medium-high heat.  
    2. Gently mix ground turkey with the chopped chipotles, adobo sauce, garlic, and a scant tsp of salt.  Make 4 3/4-inch thick patties.
    3. Oil the grill grates, and place the burgers on the grill.  Grill 5 minutes on one side, flip, and grill 4 minutes on the other.  Top each with a slice of cheese and grill 1 minute more.
    4. Assemble the burgers by spreading the buns with mayonnaise, placing the burger on top, and then topping with tomatillos, avocado, and cilantro.

    Notes:
    • The original recipe calls for ground pork, which you can certainly use as well!
    • The chipotle flavor in this is fairly subtle.  To amp it up a bit, next time I'll be adding some chopped chipotles and adobo sauce to the mayonnaise.  Yum!

    Sunday, July 3, 2011

    Jalapeno Popper Sliders

    So burgers mixed with jalapeno poppers sounds awesome, am I right?  When I saw this in Rachel Ray's Everyday magazine I just couldn't resist trying out this combo.  Yep, once again I'm back with some Rachel Ray... I picked this particular issue up at the grocery store recently as I had finished all the food magazines I subscribe to, and an amazing looking burger beckoned to me from the cover.  Not the popper sliders, but rather a burger topped with an extra-thick onion ring.  Perusing the magazine though brought me to these sliders, and I knew that I would have to try them.  I mean, who doesn't like jalapeno poppers?  (It's okay if you don't, I won't judge you too harshly.)  So in this recipe, a mini-burger is topped with the ingredients of a jalapeno popper- a seasoned cream cheese, sauteed jalapenos, and a bit more cheese for good measure- covering both jalapeno poppers stuffed with cream cheese, and those stuffed with a cheddar cheese.  It's the best of both worlds.


    Jalapeno Popper Sliders

    Makes 6 sliders

    Ingredients:
    3 jalapeno peppers, seeded and cut into rounds, or strips
    1 red Fresno chile pepper, seeded and sliced into strips
    Extra virgin olive oil or vegetable oil, for drizzling
    4 oz cream cheese
    1 tbsp grated onion
    1 large clove garlic, grated or pressed
    A small handful of cilantro leaves, finely chopped
    1/4 tsp ground cumin
    salt and pepper
    1 lb ground beef
    2 oz. sharp or smoked cheddar, or smoked Gouda, sliced
    6 slider rolls, such as 3-inch brioche rolls, or cornmeal topped dinner rolls, split

    Directions:
    1. Preheat your grill (or griddle or grill pan) to medium-high heat.
    2. Heat a medium skillet over medium high heat and add jalapenos and Fresno chile peppers.  Cook for a couple of minutes, stirring frequently, until they are charred on the edges, and crisp-tender.
    3. In a small bowl, mix together the cream cheese, onion, garlic, cilantro and cumin.  Season to taste with salt and pepper.  
    4. Season the ground beef with salt and pepper.  Form 6 small patties, with an indentation in the center of each. Brush the grill with canola oil (or other oil with a higher smoke point).  Place the patties on the grill, and grill for 2-3 minutes.  Flip the burger, top with a dollop of cream cheese mixture, and a piece of sliced cheese.  Grill for 2-3 minutes more until the burger is cooked, and the cheese is melted.
    5. Place the burgers on the rolls, and top with the chile peppers.

    Notes:
    • For the last step of the recipe, when you have flipped the burger and placed the cheeses on top, the original recipe says to put the cover of the grill down, or tent with tinfoil to promote melting.  I really didn't think this was a necessary step, as my cheese melted just fine without the top down.  
    • I loved these burgers, but next time I want to try stuffing the burger with jalapenos, cream cheese, and cheese to make it even more exciting!  A burger stuffed with jalapeno popper ingredients sounds even awesomer to me- maybe stuffed and topped with them.... hmmmmm...
    • Also next time I won't seed the peppers, as with them de-seeded there was very little heat.  It is perfect this way if you like mild food, but since I like things spicy, hopefully keeping the seeds in will be just the thing to literally spice things up.

    Sunday, June 26, 2011

    Grilled Shrimp and Sausage Skewers with Smoky Paprika Glaze

    I was desperate to use my grill by the end of last week, after numerous rainy days, and more in sight for the evening.  After checking the weather channel, and seeing that the rain was supposed to start around 7pm, I had just enough time to make my shrimp and sausage skewers before impending doom- that is, if the meteorologists were correct with their timing.  Seeing as it was 5:45, my bamboo skewers had to soak for an hour, and the kebabs had to cook for 6-8 minutes, it was a race against time.   Thankfully, luck was on my side on Friday night, as I finished up just as I felt the first raindrops start to fall.

    Deciding to chance it was the best decision I could have made though.  These skewers were so good that I would gladly had stood out in the pouring rain, sheltering them from the precipitation, if needed.  What's great about these particular skewers is that all you have to really worry about it cooking the shrimp, as the sausage used is precooked, which takes out the threat of overcooked meat from the equation- an ailment that plagues many kebabs.  The glaze was an added bonus in these skewers.  Have you ever had smoked paprika?  It is a far cry from the generic paprika which is a great coloring agent, but doesn't add too much flavor.  One whiff of smoked paprika and you know you're in a whole other flavorful territory.


    Grilled Shrimp and Sausage Skewers with Smoky Paprika Glaze


    Ingredients:
    3/4 cup olive oil
    4 large garlic cloves, pressed
    2 tbsp chopped fresh thyme (or 2 tsp dried thyme)
    5 tsp smoked paprika
    4 tsp Sherry wine vinegar
    3/4 tsp salt
    1/2 tsp freshly ground black pepper
    1/2 tsp dried crushed red pepper
    12-20 extra-large shrimp 
    12-16 1-inch-long pieces andouille sausage (about 16 ounces) (or other fully cooked smoked sausage, such as linguica)
    2 bell peppers (red, orange, or yellow), cut into 1- 1 1/2 inch pieces
    1 vidalia onion cut into 1 - 1 1/2 inch pieces, each piece should be 2 layers

    6-8 metal or bamboo skewers (** If using bamboo skewers, make sure to soak them at least 1 hour)

    Directions:
    1. In a medium bowl, whisk together oil, garlic, thyme, smoked paprika, vinegar, salt, pepper, and crushed red pepper.  Transfer half of the mixture to a small bowl for serving, and reserve the other half to use while cooking.
    2. Make your skewers by alternately threading on shrimp, sausage, peppers, and onions.  Depending on how many pieces of shrimp and sausage you have, and how many skewers, each will have about 2 pieces of each shrimp, sausage, peppers, and onions.  A couple of mine had three shrimp each.  Arrange the skewers on a large rimmed baking sheet.  
    3. Prepare grill to medium-high heat.  Coat the grates with oil (I used canola).  Brush both sides of the skewers with the glaze, and place on the grill.  Grill about 6-8 minutes, until the shrimp are opaque, turning and brushing with glaze occasionally.
    4. Serve the skewers with the reserved glaze.


    Notes:
    • The original recipe in Bon Appetit uses cherry tomatoes and red onion in place of the peppers and vidalia onion.  My tomatoes and red onion had unexpectedly gone bad, so I substituted the other veggies, so feel free to use whatever you want.  They will still be crunchy, with the edges being slightly more cooked.  Alternately, you don't even have to put the veggies on if you don't want... I was just pretending to be healthy.
    • In the original recipe, the shrimp that it calls for are the extra-large shrimp, sometimes called colossal, which have 13-15 per pound, and the recipe called for 12 which would be just under a pound.  I couldn't find these at the market, but they did have the jumbo shrimp which were 16-20 per pound.  I ended up with 20 slightly smaller shrimp, and this is why I ended up doing more skewers, with some having more shrimp per skewer.  Feel free to use either- the U 13-15 are hard to find in my experience.
    • I realized as I was making this that I didn't have fresh thyme, so I substituted the dry.  A general rule of thumb is that 1 tbsp of fresh herbs, equals 1 tsp of dry herbs.
    • I used Pimenton de la Vera for my paprika, which is a hot smoked paprika.  You can also used sweet smoked paprika if you want.  It's sometimes labeled "Pimenton Dulce" or "Pimenton de la Vera Dulce".  Don't use the normal paprika you may have in your spice cabinet- the smoked paprika makes a huge difference!

    Saturday, June 4, 2011

    Turkey Burgers with Cheddar and Smoky Aioli

    Now that it's unofficially summer, and I have a working outside grill, it seems the perfect time to start exploring the wonderful world of burgers.  Growing up, I admit that burgers were not my favorite meal in the world.... sorry mom and dad.  I have changed my opinion though now that I'm older, and have realized the burgers don't just have to mean a ground beef patty on a bun with ketchup and mustard.  I like the kicked up burgers with interesting toppings and lots of cheese far more than the plain burgers, and nowadays they are actually something I crave.  I am personally more a fan of turkey burgers, rather than beef, and so I decided that my first burger of the season would be one made with ground turkey.  After doing a little searching, I came upon a recipe for a grilled turkey burger with cheddar cheese and smoky aioli that originally appeared in the August 2009 issue of Bon Appetit.  This burger is seriously one of the best I've ever made- the toppings are awesome- cheddar cheese, grilled peppers and onions, and to top it off a delicious cumin and coriander spiced aioli. Really awesome!


    Turkey Burgers with Cheddar and Smokey Aioli
    Serves 4


    Ingredients:
    1/2 tsp cumin seeds
    1/2 tsp coriander seeds
    1/2 cup mayonnaise
    2 tbsp extra-virgin olive oil, plus more for brushing veggies
    2 tsp fresh lemon juice
    1 1/2 tsp smoked paprika
    1 garlic clove, pressed
    1 pound ground turkey, preferably dark meat
    4 red onion slices, 1/3-inch thick
    1 large or 2 small red bell peppers, quartered
    4 slices cheddar or Monterey Jack cheese
    4 hamburger buns
    arugula


    Directions:
    1. Heat a small skillet over medium heat, and toast cumin and coriander seeds about 1 1/2 minutes, or until aromatic and slightly darker in color.  Shake skillet often to move seeds around while toasting.  Once toasted, grind spices in a spice grinder, or crush in a mortar with pestle.  In a small bowl, whisk together mayonnaise, 2 tbsp olive oil, lemon juice, garlic, paprika, and spices.  Taste, and season with salt and pepper.
    2. In a medium bowl gently mix turkey with 2 tbsp of the aioli (mayo mixture).  Make 4 3/4-inch patties with the turkey, and make a shallow indentation in the middle of each burger with your thumb.
    3. Prepare your grill (should be about medium-high heat).  Sprinkle your burgers with salt and pepper on each side.  Brush the onions and peppers with olive oil.
    4. Grill onions and peppers for about 4 minutes per side, until soft and charred.
    5. Grill burgers 5 minutes on one side, then flip and grill 4 minutes.  Place cheese on burgers, and grill a minute more.
    6. Assemble burgers with desired toppings- onions, peppers, arugula, and a nice dollop of aioli.

    Source: culinarycovers.com, originally from Bon Appetit, August 2009


    Notes:

    • I highly recommend using a grill basket for the veggies in this recipe.  I unfortunately do not have one yet, and about 1/2 my onions ended up falling into the hot coals- luckily I had sliced more that the recipe calls for, and so the survivors were enough.
    • I grilled the burger buns on the grill as well, so if you like toasted buns, place them on the grill while the burgers are cooking, checking them frequently.  Move them around a little too, if some are on a hot or less hot part of the grill, so that they are toasted evenly.
    • I used white meat ground turkey for my burgers and they turned out perfectly fine, and not too dry, but the darker meat will turn out a juicier burger.  Dark meat is harder to find though- it's not carried at the Shop and Stop I go to, but is carried at Whole Foods.
    • The aioli this makes was the best part in my opinion, and you'll probably have some left over after you put it on your burgers.  It makes a great dipping sauce for fries, so I'd say that's a good way to use any extra.


    Thursday, June 2, 2011

    A Memorial Day Meal: Part 1

    Finally, the long awaited post on just what I made for Memorial Day- I know you've been desperately awaiting this post :)

    Since the grill has finally been put together (it only took about 2 years), I decided that I must cook something on it- something meaty and made for the grill.  I decided on a London Broil, because I figured it's one of the simplest things to make- and simple and delicious it was.  I have a tendency to overcook meat, and so I carefully researched just how much time I needed to cook this piece of meat for medium-rare.  The consensus I got was about 5 minutes per side over a hot fire, or 6-8 minutes per side over a medium fire.  I'm not up on the art of measuring just how hot my grill is yet- more research awaits me- but it seemed pretty hot, so I did 5 minutes on the first side, and 6 on the second, and then let it rest for about 5-10 minutes before slicing, and it turned out perfectly!

    I wanted to make some sides to serve with the London Broil as well, so I went with a tomato, feta and cucumber salad that I saw on Annie's Eats recently, and this turned out to be the absolute best tomato salad I have ever had.  I also had 1 russet potato that I wanted to use up, and some heavy cream.  For the potato I ended up cutting it in smallish wedges, adding some spices, and roasting it in the oven, which didn't make a lot, but was enough with the the other sides... and with the cream I decided on some awesome cheddar cheese biscuits, with are probably the best biscuits I have ever made.  It was pretty hard to not wolf down all of them in one sitting- they are very rich though, so that's probably not such a good idea.

    The main dish, the London Broil, will star in this post, and part 2 will have the recipes for the sides.


    London Broil


    Ingredients:
    1 pound London Broil
    Equal parts lemon juice, soy sauce and honey.  I used about a 1/2 cup of each.


    Directions:
    1.  Whisk together the lemon juice, soy sauce and honey in a container big enough to hold your meat.  I used an 8"x8" glass baking dish.  Make a few shallow cuts in your meat on each side (about 4-5 per side), and place meat in the dish with the marinade.  Marinate for a while, depending on how long you have.  A few hours is okay, but the longer the better.  I marinated mine for about 24 hours.  Turn at least once while marinating.
    2. Grill the meat about 5-6 minutes per side for medium rare over a high fire, or 6-8 minutes over a medium fire.
    3. Slice meat thinly and serve.


    Notes:

    • The marinade that I used is one that my mom and my grandmother have been using for London Broil for as long as I remember.  I actually have no idea where it came from, but if I get a source for the recipe I'll be sure to let you know.  I love this marinade though, it really couldn't be simpler, and is the perfect blend of sweet and sour. 

    Tuesday, May 31, 2011

    Grilling Machine

    I am too exhausted tonight to post any recipes- sorry guys, but I didn't want to leave you with nothing, so here's a sneak preview of an upcoming recipe- my first burgers on the grill, and they were superb.  I think I have been bitten by the grilling bug!


    Monday, May 30, 2011

    I've Been Working in the Garden

    So the garden is getting better!!  Rather than being stuck and crowded in their little plots, all the plants have been moved to their new homes!  They all are doing great so far, besides the cilantro looking a little wilted- you can pull through cilantro!!  Some of them are in their Earthboxes, and some of them are in normal planters, but hopefully they'll all flourish- oh and bonus, it appears that the mint I thought I had killed last summer is coming back!!  After I had planted them all (and run to Lowe's to get a couple more planters) I realized just how many plants I actually had, so I'll just be sticking with these for the summer... I think.  My little yard area can't really hold much more, with the new addition of a table and two chairs (Thanks Eva and Ron!!!).  Also, we finally set up our grill today, which has been almost 2 years in the making (aren't you proud Dad?!), and actually used it to make London Broil.... and we actually ate outside on our new table today- the first time that we've been able to do that since we moved into our apartment over 3 years ago.  We are moving up in the world :)


    Tiny mint plants!


    The grill

    Perfectly cooked London Broil
    So I'll be back soon with the dishes of what we had for our Memorial Day lunch.  One of the dishes was the best tomato salad I have ever had, so if you like tomatoes- try it!  Here's a sneak peak of what's to come.